Riven Guide Part 5
Head back to the orginal Gold sphere ( go back to Ghen's Lab, exit through the front door and turn right) From here the Island's power source can be activated. The exit you need is the second one on the left inside the dome. There is a lever on the right just before the bridge to the gate room - pull this baby to elevate the bridge to a higher exit. So now you need to get to this new section of walkway - take the first exit ( back and to your right now) and enter teh Gate Room by pressing the button on the right until the door opens. Run accross the gate room to the other doorway and press the room rotating knob until the next door opens. Now head for that new door, exit under the locked gate and run up to the hill top entrance to the gate room. Rotate the room once again and the next entrance should allow you to cross the room to the newly elevated section.
This is the power control centre. Remember the curious grid puzzle that appeared way back on Survey Island? Where you could press funny shaped sections to raise some water down below? Well the power puzzle is related to that, and also to the 3D landscape map room that was located behind it.
The Explanation: Basically each of the grid shapes represents one of the islands, while the coloured balls represent the location of the rotating domes. Put the coloured balls into the relevent posistions that represent each of the rotating domes on the five islands. By using the 3D map on survey island it's possible to work out exactly where the coloured balls need to go in the five by five grid, thanks to the domes appearance on the 3D maps. The book assembly Island one is harder to spot, but pay attention to the physical location of the dome - the jagged shaft above is pretty easy to spot on the map.
| gjfkjlnglsdndsojDSkh;dsk |
Which Colours? So Which Colours Corresponds to each dome? Well, remember the viewers that are used to stop the dome rotating? Each symbol in each viewer represents the correct colour to use ... hope you made a note of them! And if you didn't, here's a handy little table to illustrate:
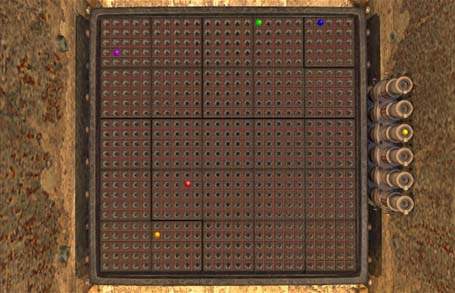
So there is a gap... but as we're yet to explore the fifth Island it's safe to assume that the leftover ball must belong in the small top right square section. But there are two spare balls - which one fits in? The yellow marble represents the power station itself ( shiny yellow ball represents a shiny yellow dome) so leave that one in its initial posistion at the side and stick the blue ball into the fifth and final place.
If that has confused you, look at the sqaure as a whole, then imagine the shape of the islands using the blocks on survey Island, then using my diagram, place these squares in the whole big square in the appropriate posistions and you should be there in no time.
Turn around and pull the lever on the wall to your left. This will reveal a white button - press this to finally activate the power supply. Of course this means that the Islands linking books are now activated. Head back to the gate room and rotate it until you can get back in the gold sphere via its second gate. Now go around the back (down the catwalk steps and outside) and just before the tunnel, press the button to get the lift to the temple Island linking book. Enter the same number code that you discovered before, open the dome, open the book and link off to another location!