Riven Guide Part 3
| |
Can't see where to go now, eh? Well, stay at the trap tunnel, and turn around - see the way the doors are still open? Close them to reveal two passage ways hidden behind the open doors! Take the left passage and head down towards the dome. Close the door leading into the dome room, to reveal another hidden door - go through this one to enter the viewing room. Look into the viewer- this stops the dome from spinning. Press the top button on the viewer when the D'ni symbol for Purple appears. (purple is the one labeled still unknown)
Yeah it'll take a few goes, but it eventually stops and opens the spinning dome. It can't be opened yet, so head back up to the trap tunnel and take the right hand passage (go straight accross) Follow the small metal pipe by the side of the track until you find the lever - pull this, ( it stops the fan rotating above the trap) and head back to the trap tunnel. Now the fan has stopped spinning you can sneak into Ghen's lab.
This changes every time you play the game. Read the book in Ghen's Lab and make a note about the number sequence you see (it's written in Dn'i numbers!), now head back to the gold dome (the one in the cave) and prepare to open it up. You have to do some thinking here - what do these new symbols mean? You should see combinations containing these symbols.
At 15, a V shape appears at the bottom of the square, like a sideways 3 we saw earlier. The symbol for 20 has a small square in the top right hand corner, which means that a combination of these symbols is needed to work out the exact combination for the dome. For example, the Dn' number for 16 is the symbol for 15 over the top of the symbol for 1. Click here for a link to the numbers. Opened it? (Hint: Slide the notches along the correct amount of clicks) Good, but it's a dead end for now! Head back to Ghen's lab, open the front door and turn right, heading out to the big gold sphere.
| dgfdshgbs;lfkhgfdhj;ofdphjfpdphs{Fhmnf;s;hmf | 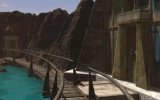 |
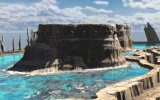
If you have been following this guide, the power should have been diverted to allow you to lower the bridge and enter the gold sphere. Follow the catwalk around to the end and move the big handle to extend the rest of the walkway. Now turn around and go through the exit you have just passed - exit here, turn around and push the button on the right - this raises the missing section of the bridge. Turn back around, cross this new section and raise the lever at the end - but don't bother with this yet- there are other things to do, go back into the sphere, turn left and go down the catwalk steps, go outside and just before tunnel, there is a switch on your right - press it to reveal....
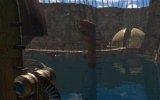
Through this underground passage lies another dome, this one stopped again by pressing the button when the D'ni symbol for Green appears. (colour chart) The number code is the same as before .... but its another dead end! Head back to Ghen's Lab, press the blue mag-lev call button and head off to survey Island.
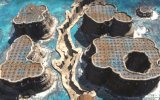
Head right across the Island, go into the lift and press the hard-to-see button on your left, Now you are on top of an overhang, walk forward and press the 'L' shaped button in front of you - this floods the corresponding shaped lump of rock. Now turn around - there is a path going through the elevator in to the other side. The rusty dome is the map room. The 3D maps are VERY important in working out how to activate the power so pay close attention on the 3D maps for each island, noting where about on the island the linking dome is, look carefully and you see all of them, then note down the coordinates on the 5x5 grid.....
 |
 |